Showing posts with label Plantin Schoolbook. Show all posts

Sunday, April 14, 2013

Smile Card

I've always wanted to own Echo Park paper.  Isn't that crazy?  I don't buy a lot of paper online because I'm too cheap to pay shipping, and my local stores didn't carry it.  Finally, Hobby Lobby, our local craft store, started carrying a few of the 6x6 pads.  So I bought all of them!  I really like Echo Park's style and the color schemes of their paper.

So, here's my first card using my new paper....


This card is really simple, but I was in a hurry and had to try out the new paper.  Aren't the colors fab?


Sadly, I cannot find where I wrote down the sizes of the cuts, so I can't share that with you.  I do know the base is from Elegant Edges and the star is from Plantin Schoolbook.  I hand cut the banner that contains the sentiment.

That's all I have for today.  Have a fabulous afternoon!

Cheryl


Monday, February 18, 2013

Monday, Monday....

Well, it's Monday again...already.  I don't know about you, but it seems like Friday takes forever to get here, then Monday comes way too fast!  I've been at work now for 34 minutes and it's already wild and crazy here.  As I mentioned previously, one of my co-workers passed away a few weeks ago.  We were already short-handed in my office, so for the last few weeks, it's been two of us doing the work of four.  This morning, we heard that the other lady in my office fell off her horse and broke her elbow (OUCH!!) and has a hurt hip so she won't be in today and possibly all week.  What a Monday morning!!!  I'm gearing up for a wild day, so I thought I'd say hello to you all before buzzing off to work...


I saw the layout for this card on Pinterest, so I thought I'd try it.  I am very pleased with the result.  The card base is 5.5" x 5.5".  The paper is Prima Doodle Deux.  I love this whimsical paper.  You can get it on Amazon here:


I cut the ovals from Plantin Schoolbook @ 1.25" and 1.5".  The stamp is by Stampendous.  I inked all the edges with blank ink.


The flowers are from Cricut Artiste and were cut at 1.25".  I used a punch for the blue circle centers.  I added a black brad to the center of each flower.


I had a fiasco with my lights that I use for photography.  I sorta broke both of them.... OOPS!  Until I buy new lights, please bear with my poor photographs.  Contrary to the bad lighting, the card is bright and cheery and fun!

I hope you all have a wonderful Monday!

Blessings,
Cheryl

Saturday, January 5, 2013

Fun Flower Card


Hello all my wonderful friends!  I hope the new year is treating you well.  Mine has been more eventful than I'd hoped, consisting of car trouble and work drama, but it's still been good and I'm happy and blessed!

I finally have a card to share with you.  Can you believe it?


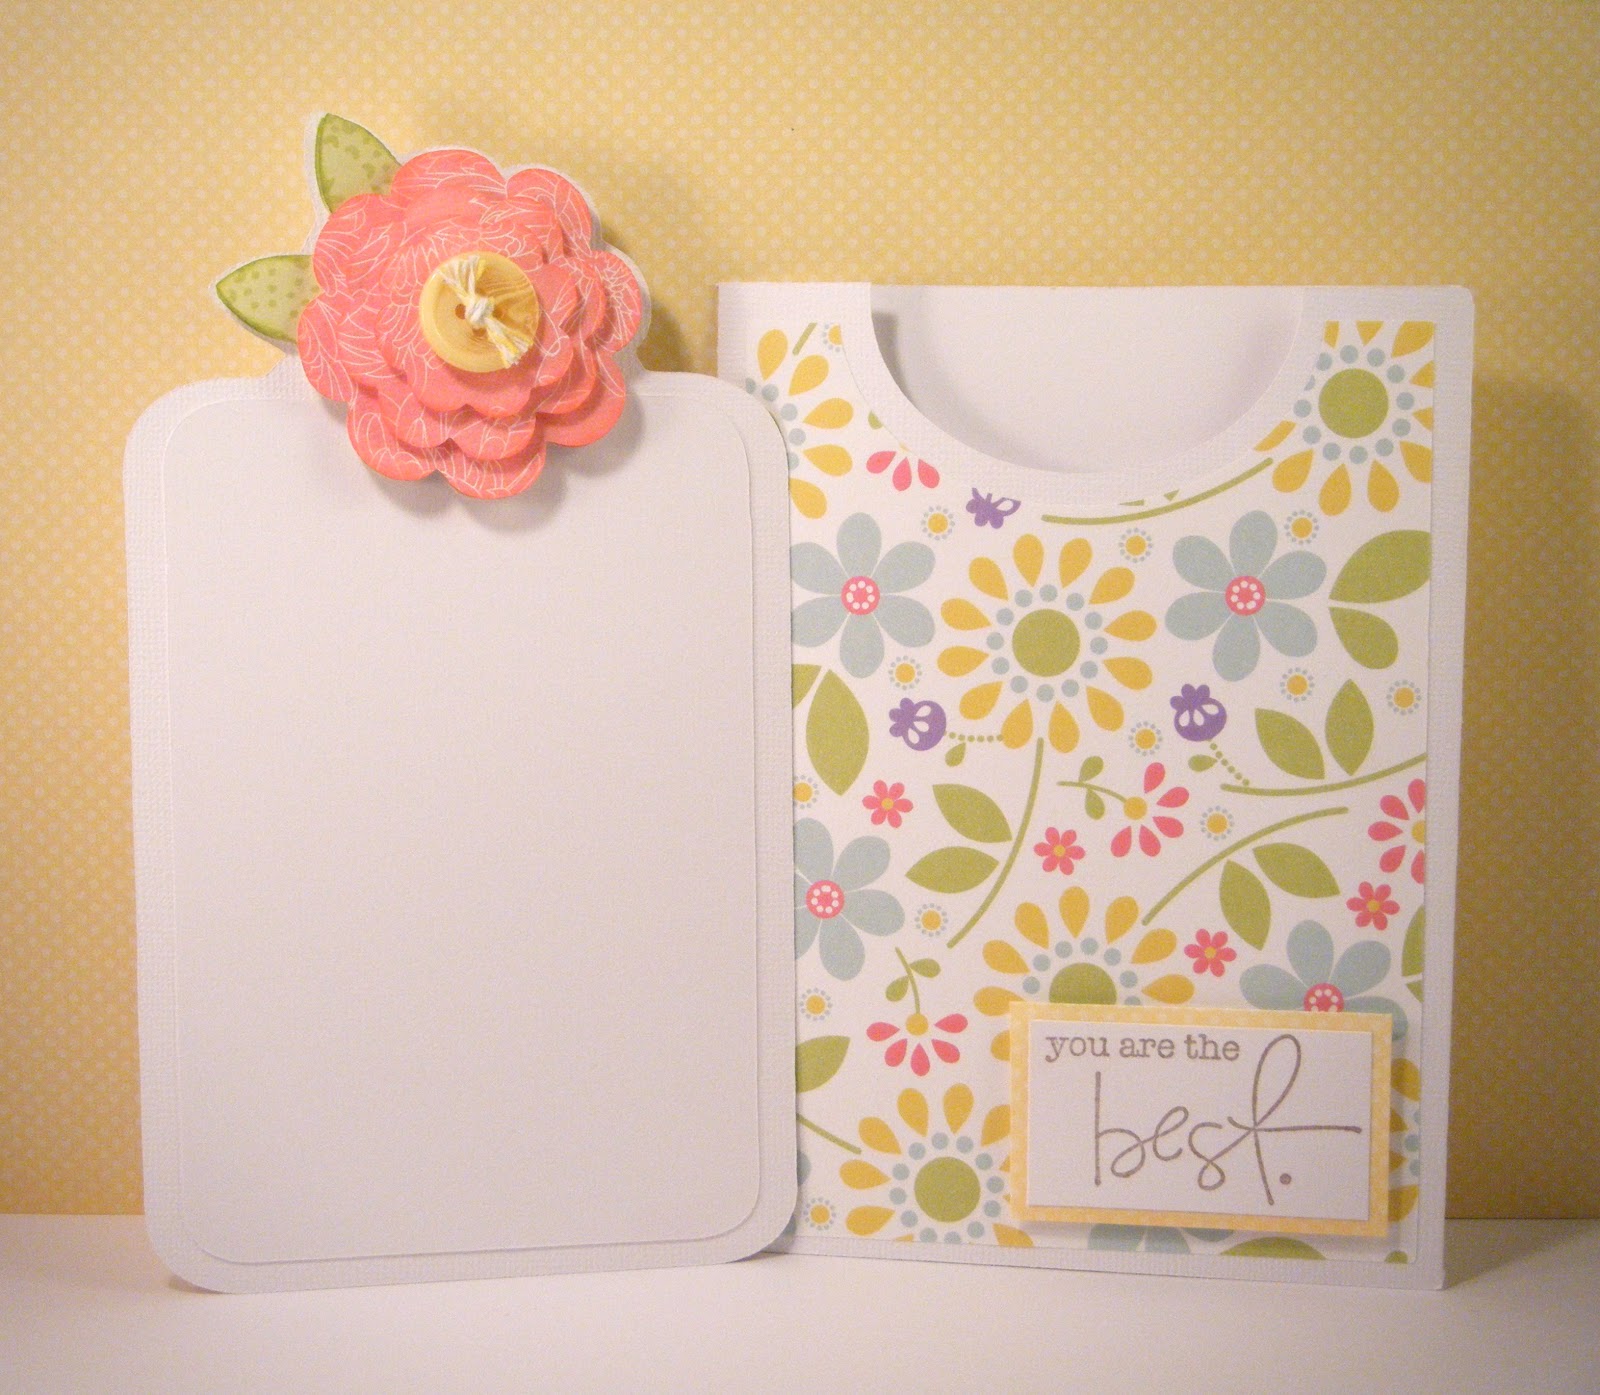
I used a shape from Elegant Edges for the base of the card.  I welded the shadows together using my Gypsy, then cut the next layer in black.  I then cut the floral layer using the same shape, but one size down.  The ovals are from Plantin Schoolbook.  The stamp I used is from Verve.  All cut sizes are listed at the end of the post.


The flowers are from Flower Shoppe and cut at 3 different sizes.  I put a brad in the center of each, then layered them and attached using foam dots.  

This card was really simple to make, but I like how it turned out.  Since I tend to give away and sell several cards per month, I often get creative block or run out of ideas.  I have decided to start trying to make several cards using the same design/sketch, so I'm working on a few more using this layout.  When you create, do you make every card different?  Or do you use the same layout/sketch with different papers? I used to try to make every single card different, but as I've needed more cards, this has become more stressful.  So, I figure when I find a layout I really like, why not use it more than once with different papers?  I'd love to hear your thoughts and ideas on this.

Card Recipe:
Patterned Paper: It's the Little Things by Fancy Pants
Solid: Recollections cardstock
Card Base: 5.5" from Elegant Edges
Black Layer: 5.5" from Elegant Edges
Floral Layer: 4.75" from Elegant Edges
Black Oval: 3.75" from Plantin Schoolbook
Striped Oval: 3.5" from Plantin Schoolbook
Cream Oval: 3.25" from Plantin Schoolbook
Flowers: 1.5", 1.75", 2" from Flower Shoppe
Brads: Oriental Trading
Stamp: Verve
Ink: Stampendous

It's so nice to be back sharing projects with all of you.  Have a fabulous weekend!

Blessings,
Cheryl

Monday, November 19, 2012

Fun Pocket Card!

For some reason, lately I am in love with cards in pockets.  I have no idea why or what caused this, but I just can't get enough.  I saw some on Pinterest and decided to make a template on my Gypsy.  I've come up with several, so I thought I'd share one today.


I created the pocket and card using Gypsy.  It took several tries to get it just right, but now I'm having a lot of fun with it.  The colors did not photograph well.  They are much brighter in person!


For the pocket, I welded together 3 rectangles from Plantin Schoolbook, then added an oval at the top of the cut.  On the card, I used a rounded rectangle and welded the shadow of the flower to the top of the rectangle so it was all one cut.  If you all are interested, I can do a tutorial and/or show how it's set up on the Gypsy.  You could also do this using the Cricut Craft Room if you don't have a Gypsy.  And that's F-R-E-E!!  You can't beat that.


I used a stamp by Studio G from Walmart and just cut it out with the trimmer.  On a side note, I'm really bothered that the yellow on the sentiment doesn't match the yellow on the flower paper.  It's from the same stack and is made to coordinate.  It drives me nuts and I didn't notice until I took the picture.


The flower is from Forever Young.  I added each layer with foam tape so it would really stand out.  I inked all the edges using green and pink ink.


Here's a close up of the top of the card and pocket.  As I said, it took a lot of tweaking, but it was totally worth it.  I made another card using this same design, so I'll share that later.

That's all for today, folks!
Cheryl


Monday, October 22, 2012

Happy Card!


I am really excited about the card I'm sharing with you today.  It's so bright and cheery and happy!


I've seen many flowers made using circle punches, so I thought I'd try my hand at it.  Of course, I used my Cricut and not punches, but it works!  I have had one sheet of this striped paper forever and finally decided to use it.  It was hard to cut into it because I like it so much (and want to hoard it), but I managed to pull out that trimmer start cutting.


I layered 3 circles on top of each other with foam dots in between, so they really stood out.  I also put the leaves on using foam dots.  The sentiment is a stamp by Stampendous and the blue border came from Elegant Edges.


I can't wait to make more of these flowers!  I really had fun with them and I think they could be great if I tried mixing patterns and colors on each flower.

Card Recipe:
Base - Recollections Cardstock, cut at 9.25" x 4.75"
Striped Paper - Colorbok, cut at 9.25" x 3"
Blue Paper - Colorbok, cut 2 using Elegant Edges @ 1.47", Border <shift> on pg 55
Yellow Paper - Colorbok, cut at 9.25" x 4
Flowers - The Paper Studio, cut using Plantin Schoolbook @ 1.5", 1.25", 1", Circle on pg 72
Leaves - Recollections, cut using Straight From The Nest @ 4", Branch-1 <shift> on pg 42

Have a fabulous day!

Adios,
Cheryl


Thursday, June 28, 2012

Star Birthday Card

Happy Birthday To You!  Happy Birthday To You!  You look like a monkey...and you smell like one too!

Friday, April 27, 2012

Envelope Card

Hi my crafty friends!  Thanks for stopping by today.  I wanted to share a card I made a while back and just realized I'd never posted.  I've seen cards like this on several blogs over the years and have always liked the idea, so here's my version!

Tuesday, April 17, 2012

Elephant!


I just love elephants.  Don't you?  Ever since I saw Samantha Brown on the Travel Channel riding an elephant in India, I decided I want my own to ride around on! And I would name him Alfred.  (I think Alfred is a dandy name for an elephant)  I'm really not crazy, I promise.  I just love animals...except for Llamas.  I don't love any animal that even resembles a Llama.  While at a petting zoo as a child, a llama, with hatred in his eyes, viciously spit on me and ruined any love I would ever have for those animals.  I think they are horribly mean creatures.  Wait....How did I get on that subject?

Friday, March 2, 2012

More Flower Cards!

Hi Everyone!  I have a couple of cards to share with you today.  I am SUPER DUPER excited that I filmed my first video for you guys this week.  I did a tutorial on how to make the cards shown below and in this post.  I am working on editing the video and oh boy - this is all new to me!  I enjoyed filming and can't wait to do more.  I hope to have the video up in the next day or so, but until then, here are a few cards to look at!

Thursday, March 1, 2012

Mojo Monday...a liltte late!

Does it ever seem there aren't enough hours in the day?  Some days I feel I could use some extra hours for sure.  I made this card last week based on the Mojo Monday sketch...then ran out of time to post it!

Thursday, January 12, 2012

Happy Flower Card


It finally happened.  We had snow last night in Oklahoma.  I think snow is one of the most beautiful things God ever created and have been waiting all winter for it to happen.  I came out of the door at church and saw these big, beautiful, swirling snowflakes glistening under the lights of the parking lot.  {big smiles}  It only lasted a short time, and I was hoping for more, but I enjoyed it while it lasted.

Monday, December 12, 2011

Is it Monday already?


Happy Monday!  I hope you all had a wonderful weekend.  As always, it was too short!  Today I want to share a card I made a while back and had forgotten about…

Saturday, December 3, 2011

We're off to see the Wizard...


A few weeks ago, we had a mini-retreat at our church for the women.  The church was set up with scenes from The Wizard of Oz.  We followed the yellow brick road to each scene and heard from different speakers along the way pertaining to different characters from the story...

Thursday, December 1, 2011

Masculine Birthday Card


Happy December!  Can you believe it's December 1st?  I can't.  This year's flown by super fast!  Today I want to share a simple, masculine birthday card I made for my friend at church.

Friday, October 21, 2011

Ghost Treat Bag

Don't you love fall weather?  I do!  I completely hate being hot, so summer isn't my thing.  I love fall and winter.  In Oklahoma, sometimes it takes us a while to get chilly fall weather and it finally came this week.  When I woke up this morning, I opened my back door just to step outside and feel the chilly breeze.  Correction - in Oklahoma we almost never have a "breeze".  It was more like a major 40 mph wind gust, but still wonderful and cool.  This weather can only mean one thing...Halloween is just around the corner!!  Since I don't have kids, I don't have to worry with costumes and such, but I still like the holiday.  I bought a ton of candy (yeah, coupons!) so I had to make some bags to put it in.  Here's one of them...

Thursday, August 4, 2011

Say Cheese!

My friend at church ordered some cards from me last week.  He asked for 5 thank you cards, 3 masculine and 2 feminine.  The 2 girlie ones - No prob Bob.  Easy as pie!  So, moving on to the masculine ones, I started hitting the wall, but made it through 2 of them.  Then came the big challenge.  You see, my friend Jimmy is a photographer.  He just had a conference and wanted to send a thank you card to a fellow photographer, who happens to be male.  He asked that his card have a photography theme.  4 attempts later and this is what I came up with.


Let me start out by saying I do realize this is not a Polaroid camera and yes those are supposed to look like Polaroid pictures.  But oh well!  I like em anyway!  I made the white "frame" for the picture using a couple of squares from George and Basic Shapes.  I cut the cityscape from Plantin Schoolbook.  


The camera is from Create a Critter.  I cut the gray parts from metallic paper (I know it's hard to see in the pic) and added glossy accents to the lens to make it shiny.


I also added some black cord to the camera for a strap and put it on with foam tape to make it stand out.  I wrote thank you on the picture with a Sharpie.  I was going for the look of someone documenting their pictures like they did back in the day.  Remember when people took Polaroid pictures and wrote the names and dates on the bottom?  I do.  Vaguely.  I never had a Polaroid camera, but I do remember going to school or church and them taking our picture for mother's day crafts using a Polaroid.  How did we ever take pictures without a digital camera and photo editing software?????

I would never have known I'd have this much trouble with this simple card.  When I know someone is paying me their hard earned cash for cards, I tend to OBSESS over them a bit too much.  I want them to be happy with the finished product and feel they got their money's worth.  I would hate for them to give someone a hideous card with my name on the back of it!  Or....gasp!  Pay me for a card they're too embarrassed to give away because they think it looks bad.  I know I'm probably the only one who does this, but my type A personality can't help it.

One last thing, I promise!  As I mentioned, my friend Jimmy is a photographer.  He does a podcast each week with photo tips and ideas and offers instructional CD's and DVD's for sale.  If you want to learn some tips or become better at photography, you should check him out at the Photo Tips site.  I promise, he's not paying me to say this, it's my honest opinion!

Well, that's it for today.  Have a blessed and happy Thursday!

Blessings,
Cheryl

Friday, January 14, 2011

Flaunt it Friday’s Challenge #7

Happy Friday everyone!  I hope your week has been fabulous…but thank goodness it’s the weekend.  Since Monday is a holiday, I am off work so that makes the weekend so much better!  Today’s challenge over at Flaunt it Fridays is to use the skull from Mini Monsters.  I am a proud member of the design team, so here’s my project for this week.  I don’t own that cart (but want to!), so I used the skull from Indie Art instead.
DSCF6732
DSCF6738
DSCF6728
DSCF6735
Recipe:
Door hanger from Tags, Bags, Boxes and More
Skull from Indie Art
Stars from Plantin Schoolbook
Patterned paper by The Paper Studio
Colored cardstock by Colorbok
Doodling done with Sakura Gelly Roll pen in white
Pop dots by The Paper Studio
Thanks for looking!  Go check out the designs from the rest of the team at Flaunt it Fridays and come flaunt with us!!  I can’t wait to see what you all come up with.
Blessings,
Cheryl

Tuesday, December 28, 2010

Flaunt it Friday Challenge #4

There's a new challenge blog that I'm really excited about called Flaunt it Fridays. This is my first time to participate in their challenge and I'm super excited to join in. The challenge was to use the turtle from Create a Critter and make something other than a card. I decided to make a gift bag using the cut from Plantin Schoolbook. My first thought, of course, was a green turtle. Then, I decided on pink....surprise! But, I'm trying to broaden my horizons...ha ha....so I went with purple. I really like the bag in person, but I have to say, it did not photograph well AT ALL! Have you ever made something and taken like a gazillion photos and none of them capture the colors or style properly? Well, that happened with this. I have this neato new photo tent with fancy lights that my dad bought me and it has definitely made my pictures look better. But even with that, there was no getting a good pic of this bag. So, I gave up and said "oh well!". Here it is anyway. In real life, the colors look really good....so just squint your eyes and pretend it's beee-u-ti-ful, ok?Blessings,

Friday, November 26, 2010

Cricut Cardz Challenge #52

The challenge this week at Cricut Cardz Challenge is to make a card using ONLY words from your Cricut - No pictures or other shapes. That's pretty hard when you have a {mild} addiction to your Cricut like I do. I say mild because it could always be worse, right? Anyway, I decided to use my Gypsy and make my words instead of using a sentiment on one of my carts. I used Plantin Schoolbook and Gypsy font for the lettering. It's quite simple but for some reason I really like it.

I used kraft for the background (that you can barely see). Then used my white Gelly Roll pen to do faux stitching, added a green button over the i, then voila! I was done.

Blessings,

Friday, October 8, 2010

Ghost Card

My co-worker asked me to make her some Halloween cards. Here's the first one I made. I created the ghost using my new favorite thing, my Gypsy. I welded some tags from Tags, Bags, Boxes and More and added the smile and eyes from Plantin Schoolbook. The BOO letters are from Sesame Street Font. The actual card is green and the orange you see is the envelope.

Blessings,
Cheryl