Showing posts with label Flower Shoppe. Show all posts

Monday, April 15, 2013

Happy Tax Day!


If you're in the USA, Happy Tax Day!  Honestly, it's not normally a happy day for me.  How about you?  My husband and I are married with no kids, so we don't get many tax breaks, thus we normally owe Uncle Sam a good chunk of change.  This year, God blessed us with the biggest federal refund we've ever had!  Now, it's not like $5000.00 like those of you with a bunch of kids, but it's a lot to us and it was certainly a blessing.  So, tax day is a happy day this year!

On to the card...


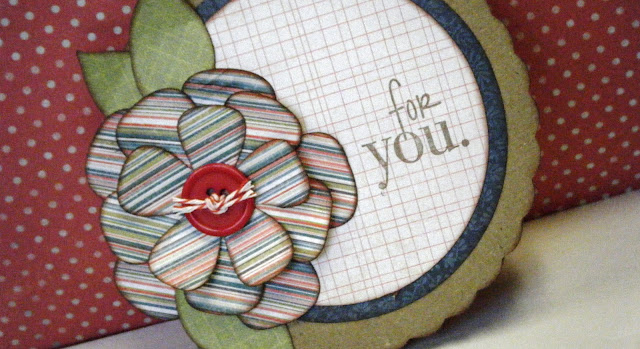
Here's a super simple pocket card I made a few weeks ago.  I really like this style of card and it's great if you're not mailing it, since it doesn't have an envelope!


I really like this gingham-ish paper on the flower.  It's from a stack called "All the Small Things" and it's a very eclectic mix of patterns.


Here's the simple card that goes on the inside.  I am saving this card for my "no-frills" friend at work.  Her birthday is coming up and she doesn't like pink, girlie, sparkly things, so I think this fits her perfectly!

Card Recipe:
Card Base - 9.75" x 5.50", scored at 4.50"
Mat (front) - 5.25" x 4.25"
Leaves - Flower Shoppe, cut at 1"
Flower - Flower Shoppe, cut at 2.75", 2.25", 1.75"
Inside Card - 4.25" x 5" and 4" x 4.75"

Have a great Monday!!
Cheryl


Friday, April 12, 2013

Sunny Yellow Card!

Happy Friday everyone!  I hope your week has gone well.  I spent a few hours this week editing the gazillion  pictures of cards on my camera and I'm finally ready to share some with you.  I had totally forgotten about this card, so finding the picture was a nice surprise!


For the base of this card, I used a cut from Elegant Edges.  It's the "book" cut from page 48, sized at 5.25'.  I welded two of them together to make the card, which fits in an A2 sized envelope.  


The paper is My Minds Eye - Lost and Found.  I inked all the edges with black ink, then added the sentiment, which is by Stampendous.


The flower and leaves are from Flower Shoppe.  The flower was cut at 1.00", 1.25" and 1.75".  I apparently didn't write down the size I cut the leaves, but I would guess around 1.75"  I punched two holes in the middle of the flower and tied some twine through.


I used my scraps for the inside of the card, just to jazz it up a little.  This card was quick and simple to make.  I think this would be a great design to mass produce using scraps.  I just might do that...

Check in later today for Font Friday!

Blessings,
Cheryl


Saturday, March 16, 2013

I {heart} pink!

As I've said before, I LOVE pink.  I mean love it with all my heart.  One of my ultimate goals is to own a pink car.  I always tell my husband that I will never understand people who settle for being boring.  I think a pink car is anything but boring!  I could totally go for this...


I had a Barbie corvette like this when I was a kid. (Yes, I loooooove Barbie!!)  I would so own this car if I could.  And I would proudly drive it all over!  

So, I was going to share a pink card, then got sidetracked by the beauty of all things pink.  Let's get back on track here...


As I said in the last post, my lights are broken, so please bear with my poorly lit photos.  I've been so busy and scattered lately, I keep forgetting to buy new lights!  All the paper for this card is from the Lost & Found Two stack by My Mind's Eye.  You can get it on Amazon here:


Here's a side view of the card...


And one more close up of the front...


Here's the recipe for the card:

All papers - My Mind's Eye Lost & Found Two stack
Leaves - Flower Shoppe, cut at 1.25" & 1.5"
Flowers - Flower Shoppe, cut at 1.75", 1.25" &.75"
Base - Elegant Edges, welded and cut at 5"

I hope you've enjoyed all the pink-licious-ness!

Blessings,
Cheryl


Wednesday, February 6, 2013

Flowerpot Card

Happy Wednesday Everyone!  I hope you have all had a wonderful week.  Mine has been really busy, but good.  As I mentioned last week, one of my co-workers passed away unexpectedly.  Everything at work has been a little off for a few days, so we're trying to get back on track.  I found out that I will be taking over her job.  It's more detailed work, but it also means more money!  Woohoo!  I have been trying this week do to my job plus hers, so it's made for a crazy week.  Not bad, just crazy.  I thought I'd take a few minutes and post something and clear my head before diving back in.


(Please excuse the picture quality - I took it on my desk at work)

My manager asked me to make her a thank you card for a lady in our office.  The recipient is really into bright colors, so I decided to do a bright, cheery flowerpot card.


Here's a shot of the card from the inside.  I got the instructions HERE.  I punched a border in white using one of my Martha Stewart punches and added to the "lip" of the pot.


I glued on all the leaves first, then added the flowers.  All the leaves and flowers are from Flower Shoppe.  


These cards are so simple to make, yet I think they make a great impact.  I really enjoyed making this and layering the flowers.  You know how I am about paper flowers....  They make my heart happy!

Have a wonderful day!
Cheryl


Saturday, January 5, 2013

Fun Flower Card


Hello all my wonderful friends!  I hope the new year is treating you well.  Mine has been more eventful than I'd hoped, consisting of car trouble and work drama, but it's still been good and I'm happy and blessed!

I finally have a card to share with you.  Can you believe it?


I used a shape from Elegant Edges for the base of the card.  I welded the shadows together using my Gypsy, then cut the next layer in black.  I then cut the floral layer using the same shape, but one size down.  The ovals are from Plantin Schoolbook.  The stamp I used is from Verve.  All cut sizes are listed at the end of the post.


The flowers are from Flower Shoppe and cut at 3 different sizes.  I put a brad in the center of each, then layered them and attached using foam dots.  

This card was really simple to make, but I like how it turned out.  Since I tend to give away and sell several cards per month, I often get creative block or run out of ideas.  I have decided to start trying to make several cards using the same design/sketch, so I'm working on a few more using this layout.  When you create, do you make every card different?  Or do you use the same layout/sketch with different papers? I used to try to make every single card different, but as I've needed more cards, this has become more stressful.  So, I figure when I find a layout I really like, why not use it more than once with different papers?  I'd love to hear your thoughts and ideas on this.

Card Recipe:
Patterned Paper: It's the Little Things by Fancy Pants
Solid: Recollections cardstock
Card Base: 5.5" from Elegant Edges
Black Layer: 5.5" from Elegant Edges
Floral Layer: 4.75" from Elegant Edges
Black Oval: 3.75" from Plantin Schoolbook
Striped Oval: 3.5" from Plantin Schoolbook
Cream Oval: 3.25" from Plantin Schoolbook
Flowers: 1.5", 1.75", 2" from Flower Shoppe
Brads: Oriental Trading
Stamp: Verve
Ink: Stampendous

It's so nice to be back sharing projects with all of you.  Have a fabulous weekend!

Blessings,
Cheryl

Monday, October 15, 2012

Imitation!


Imitation is the sincerest form of flattery, right?  Today's card is my imitation of an unknown, talented crafter on Pinterest!  I saw this card a few weeks ago on there, but the link doesn't work, so I can't give credit the original creator.  So, if you're out there, thanks for the card inspiration!


I loved idea of the little picket fence.  I used Wrap It Up for the fence.  After I cut it, I ran it through my Cuttlebug using a wood grain folder.  I inked the edges with brown chalk ink.  I adhered the fence using foam dots to make it stand out.


The flower petals and center are from Flower Shoppe.  I layered many of the flowers and inked all the edges in brown.  I stamped the sentiment and hand cut the pennant shape.


Here's what I did to the inside of the card.

That's it!  Super simple, huh?  My brain is now thinking of more fence card ideas.  I think it would be cute to cut the fence in different colors and do all kinds of flowers.  Although the card is quite simple, I am really fond of it. 

I'm so glad you came to visit Pink and Paper today.  I know I've said it before, but it's the highlight of my day to get to share things with all of you.  Thanks for reading!

Blessings,
Cheryl

Wednesday, October 10, 2012

Simple Birthday Card


I have a simple, quick card to share with you today.  I absolutely love the Lost and Found papers by My Mind's Eye.  I have used that stack over and over.  If you haven't seen it or are interested in buying some , check it out HERE.


This card started out totally different in my mind.  It's sorta plain, but everything I tried to add just looked weird.  I decided to go ahead and share it with you, even though I feel like it's missing something.


The flower is from Flower Shoppe.  I added a wooden button and some twine from my store. I inked all the edges with black ink.


The sentiment is a stamp from Verve. I have to say it again.  I LOVE VERVE STAMPS!!  

I feel this card turned out OK and I think the great papers really helped it, but it's just missing something.  What do you think?

Card Recipe:
Paper - Recollections and My Mind's Eye
Card Base - 5" x 5"
Flower - Flower Shoppe, pg 14 <Heart2>
Button - Studio G
Twine - Pink and Paper
Ink - Colorbox
Stamp - Verve

Thanks for stopping by today!

Blessings,
Cheryl

Wednesday, October 3, 2012

Simple Pink Card

 I made this card several weeks ago and then never mailed it.  Pathetic, I know.  I had every intention of doing it, then lost track of time and just didn't.  Thankfully, the person I was going to send it to is well now!  I thought I'd go ahead and post it anyway and save it for when I need a Get Well card.


Surprise!  Its has a flower on it!  I just can't help myself.  I will say, though, this was made before I went on my strike from making cards with flowers (just to see if I could).  And I have been successful so far, but I tell ya, I miss em!  And I'll be making more very soon!  I used my Gypsy and welded together the shadows of this shape to make the card base.  


I cut the flower and leaves from Flower Shoppe and hand cut the banner for the sentiment.  I inked all the edges using Martha Stewart ink.


Here's a pic of the inside.  I added some extra flowers just because.

Card Recipe:
Base - Recollections Card Stock, from Elegant Edges cut at 4.5"
Front layers - DCVW Floral Stack, from Elegant Edges cut at 4.5" & 4.25"
Flowers - Martha Stewart Card Stock, from Flower Shoppe cut at 1.5", 1.25", 1"
Leaves - The Paper Studio Card Stock, from Flower Shoppe cut at 1.5"
Ink - Martha Stewart
Stamp - Stampendous
Pearl - Recollections

I hope you enjoyed this simple card.  Of course, I love it because there's so much pink!

Blessings,
Cheryl


Wednesday, September 26, 2012

Top 5 Cartridges

As I've mentioned many times, I am not a fan of bugs.  A few weeks ago, on a Saturday morning, my hubby and I sat down on the couch to eat our oatmeal before he went to bed (he works nights).  My desk is in my living room and I have this rolling cart beside it that has a bunch of drawers with stainless steel accents.  I looked across the room and saw this hanging under the bar on top of the cart.


Ewwwwwwwwwwwwwww!

A praying mantis was perched upside down on the rails.  I start shrieking, like any normal, bug-fearing woman would do.  My husband is like "Zip it and get the camera!".  He thought it was super cool, so he took a ton of pictures before putting him in a cup and letting him go.  Of course, then I got a lesson on how important they are because they eat other bugs and are "so neat and cool".  I still don't like them and their creepy antennae, long legs and beady eyes!  His lesson did not change my mind.  I am still an irrational, bug-fearing gal.

On to more pleasant topics....

Today, I wanted to talk about cartridges.  For a while there, I was buying a new cartridge every month.  I would wait impatiently for Hello Thursday and make my list of what I wanted.  I must admit, I don't feel that way much anymore.  A lot of the new cartridges have been digital or lite and not really things I would use frequently.  I have several older carts that I seem to use on almost every card.  I thought I'd share my favorites with all of you, in case you're in the market for some new carts!  Here goes...


Elegant Edges - Thanks to you all, I bought this cartridge.  I put it off for a long time because I was being cheap, but after all the comments telling me it was good, I went for it.  And I can say, it's probably my favorite cartridge.  If you don't own this one, I would highly recommend it.


Birthday Bash - When I bought this cartridge, I was on the Flaunt it Fridays design team and I needed it for some projects.  I wasn't sure I even wanted it before then, but I figured I could use it eventually.  It's great!  Besides the great cuts for kid's cards, it has good shaped cards and I love the Ice Cream Sundae cut on it!  The font is really nice as well.  It's very versatile and has much more than you'd think at first glance.


Flower Shoppe - Do I even have to explain this one?  My love for flowers is quite obvious if you've been to my blog at all!  I love, love, love the 3D flowers on this cartridge.  This one is tied with Elegant Edges for my most used cart.  Buy it today!!!  You can get a really good deal on it right now at Amazon.  Go HERE to check it out.


Tags, Bags, Boxes and More 2 - I {heart} boxes and bags!  The original TBBM was a good cartridge and I used it like crazy.  This one is much more versatile and has some very creative cuts.  I really like the cards and envelopes...although I haven't figured them all out yet!  The scoring blade option is awesome as well, especially when you have to cut 25 bags at a time.


Forever Young - This is just a fun cartridge!  It's girlie, flirty and super cute. The silhouettes  are really nice, but my favorite cuts are the flowers.  They have lots of layers which gives you a great amount of versatility in using them.


These are some of my favorites.  What are yours?  I have a few new ones I want to buy, and Wild Card 2 is on the top of that list.  Have any of you bought/tried that cart?  I'd love to know your feedback.

Have a blessed day!
Cheryl

Tuesday, August 28, 2012

Funky Flower Card


Happy Tuesday Everyone!  Today I want to share a funky flower card with you.  And to tell you I made a decision - it's serious, so listen closely.  I am vowing to not put flowers on my next 5 cards.  I have a serious addiction to making flowers and I think I need to branch out, so this is the last flower card you'll see for a few weeks.  Just don't judge me too harshly if I fall off the wagon.  It's tough for me to stay away from those flowers.  True story.


Tuesday, July 31, 2012

You are Fabulous!


It's been so long since I just sat down and crafted just for fun....and I love it!  I don't know about you, but I feel like I'm the most creative when I'm not on a deadline or have to make something specific.  I sat down at my desk over the weekend and just decided to make a card.  Here's what I came up with...


Thursday, May 31, 2012

Fun Flower Card!

Hello friends!  Today I want to share a simple card I made a while back.  It turned out way better than I expected, so that's always nice!

Thursday, May 24, 2012

Mojo Monday 242


Happy Thursday!  This week is just flying by, which is lovely since we have a long weekend coming up!  Today I want to share a card based on this week's Mojo Monday sketch.

Monday, May 21, 2012

Happy Birthday, Mom!


Yesterday was my mom's birthday, so I wanted to share the card I made for her.

Thursday, May 17, 2012

Big Flower Card

Good morning fellow paper addicts!  I hope your week is going by wonderfully.  We are almost to the weekend, which definitely brings me a smile!  I have a really simple card to share with you today.

Saturday, May 12, 2012

Paper Clip Bookmarks

Howdy Folks!  I am back with another project I made for teacher appreciation week.

I decided to make them all a set of paper clip bookmarks.  Each set contained a butterfly, rolled flower and a regular flower in coordinating papers.  I made several styles, so I have lots of pictures to share!  I failed to take any pictures until they were packaged and ready to go, so please excuse the glare from the plastic packaging.

**I used a different paper pack for each set of clips.  I am posting this from work on my lunch break and don't have the list with me.  If you'd like to know about any specific paper, please leave me a comment and your email address and I will gladly respond with that information.  I will post the cut sizes when I get home.**

This one is my favorite...I think.  I keep changing my mind because I love them all!  I got the paperclips from Staples and they are jumbo size.  I chose gold instead of the traditional silver because they looked shinier.  True story.  I really like things that shine.  I put each item on the clip with a glue dot.  I will be doing a tutorial on these soon.


For each butterfly, I cut two sizes and adhered them together, then bent the top one to give it some dimension.  The butterflies were cut from Gypsy Wanderings.


This is glitter paper so it's all sparkly!

I have mixed reviews on this set.  I really like the "earthy" tones for a change.  And I love the patterned paper on the flower on the right.


All the rolled flowers came from the Flower Shoppe cartridge.  I basically just went down the line on the keypad and used a different flower for each set.  I have never been so sick of rolling flowers in my life!  Thank goodness I bought a quilling tool a while back because it really helped make it go faster. 


The rolled flowers on this set were a big pain in the backside!  Because I cut them so small, this one kept tearing on me.  I like the way they look, though!

And, last but not least, the men's sets!  There are only 3 male teachers and I really struggled with what kind of clip they could use.  I honestly figure they'll never use these, but I didn't want to do pencils or crayons since they're on the other boxes I made.  I really like how bright and fun they.  I may need to make some for me...

I put each set of clips on a card I designed on my Gypsy using George and Basic Shapes, then put them in the clear bags and taped them shut on the back.

That's all, folks!  I hope you're having a fabulous weekend.

Hugs,
Cheryl