Happy Tuesday friends! I hope you all had a fabulous weekend. Mine went by way too fast, but otherwise it was nice. Since I had the day off yesterday, I worked on a project I'd been wanting to try for a while.
Every year, in June, we have a ladies retreat at our church. It's Friday & Saturday, and I teach a craft class each day. I really enjoy it, although sometimes they frustrate me while we're doing it! =) I believe that everyone has the ability to do something if they put their mind to it, so when I hear "I'm not crafty enough" or "I can't do it", I disagree! So, each year, I am on a quest to come up with crafts that will be fun, useful and easy enough that everyone can do without too much stress. I decided one of our crafts will be altered memo pads this year. I saw a really cute one here and emailed Dawn about how she made it. Not only was she nice enough to tell me how, she sent me one in the mail for reference. I was blown away by her kindness. I am still working on getting the memo pads ready for our retreat, but I wanted to start carrying one in my purse, so I thought I'd make one for myself.
Here's the pad I decorated for my purse. The color in the pictures turned out pretty bad, so just to let you know, the red button and the red paper really do match! For our retreat, we're using 3" x 5" pads, but this one measures 4" x 6". Here's how I did it:
Start out with any spiral notebook of your choice, as long as the "spiral" is metal and not plastic. I got mine at Staples and they cost around $1.00 each.
The first thing you want to do is remove the spiral wire holding it together. As you can see, it's bent on each end to keep it in place.
Use some pliers and bend the wire out on each end.
After bending the wire open, you can easily remove the wire from the notebook.
You will now have your covers (front and back), your pages and the wire binding. Put aside everything but the front cover.
I decided to cover mine with kraft cardstock. Since I've been making several of these to use as examples at our upcoming retreat, I've discovered that a 4" x 6" notepad doesn't necessarily measure that exactly. After having my cover showing around the edges a couple of times, I decided to cut my paper a little bigger, then trim it down to fit after I adhere it to the cover. I used some tape by The Paper Studio and put it all over the cover. It's not quite as good as the red sticky tape, but a lot cheaper and works just fine for this.
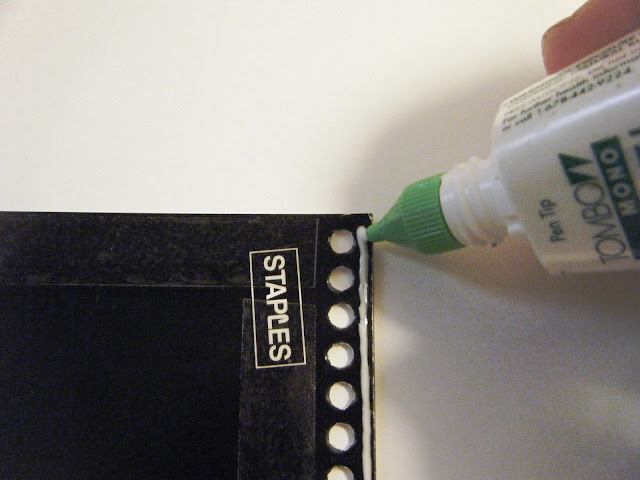
After adding the tape, I put a line of glue across the top to make sure it was sealed well above the holes.
This is how it looked after I adhered the paper to the cover. I used my trimmer and cut off the excess so the kraft paper matched the cover size perfectly.
Once the cover is adhered, you'll need to punch the holes. I used my Crop-A-Dile on the smaller setting. You could use any kind of hole punch, but it will need to be smaller than a regular size punch.
You should now have your cover done and ready to decorate.
Here's how I decorated mine. Can you believe there's not one Cricut cut on this project? Gasp!!!
After your cover is decorated, you're ready to re-assemble the notebook. I prefer to use a couple of binder clips to keep everything lined up straight so I can put the wire back through.
Simply wind the wire back through the holes.
Once the wire is through the holes, use your pliers and bend it back the way it was originally. That's it! You're all done!
I have put off making these for a long time because I thought it would take too much time and effort to remove the wire, punch the holes, etc. They actually go really fast. These would be great for gifts or favors. They're also just fun to make for yourself! Once I have them all done for our retreat, I'll post some pics of the smaller ones I made.
Blessings,
Cheryl


great tutorial Cheryl!! good luck with the class:-) we have a Ben Franklin craft store nearby and they sell notebooks with a kraft colored front with the intention of altering them.
ReplyDeleteSo cute Cheryl. : )
ReplyDeletelove it
ReplyDeleterosiemini@gmail.com
www.scraplovingminis.blogspot.com