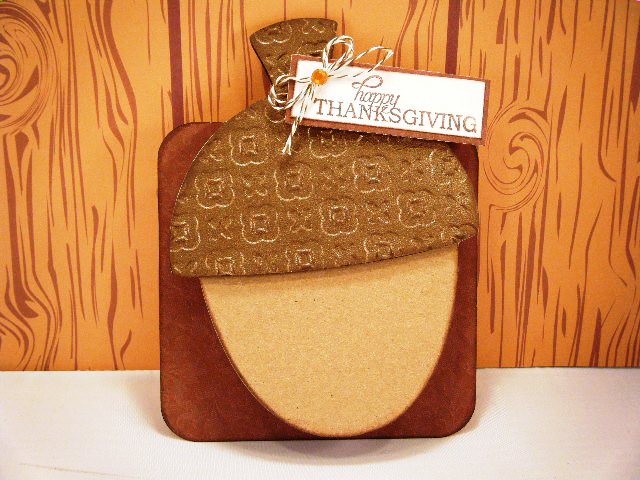
Hello friends! Today I want to share a simple card I made a while back. It turned out way better than I expected, so that's always nice!
Showing posts with label George and Basic Shapes. Show all posts
Thursday, May 31, 2012
Saturday, May 12, 2012
Paper Clip Bookmarks
Howdy Folks! I am back with another project I made for teacher appreciation week.
I decided to make them all a set of paper clip bookmarks. Each set contained a butterfly, rolled flower and a regular flower in coordinating papers. I made several styles, so I have lots of pictures to share! I failed to take any pictures until they were packaged and ready to go, so please excuse the glare from the plastic packaging.
**I used a different paper pack for each set of clips. I am posting this from work on my lunch break and don't have the list with me. If you'd like to know about any specific paper, please leave me a comment and your email address and I will gladly respond with that information. I will post the cut sizes when I get home.**
This one is my favorite...I think. I keep changing my mind because I love them all! I got the paperclips from Staples and they are jumbo size. I chose gold instead of the traditional silver because they looked shinier. True story. I really like things that shine. I put each item on the clip with a glue dot. I will be doing a tutorial on these soon.
For each butterfly, I cut two sizes and adhered them together, then bent the top one to give it some dimension. The butterflies were cut from Gypsy Wanderings.
This is glitter paper so it's all sparkly!
I have mixed reviews on this set. I really like the "earthy" tones for a change. And I love the patterned paper on the flower on the right.
All the rolled flowers came from the Flower Shoppe cartridge. I basically just went down the line on the keypad and used a different flower for each set. I have never been so sick of rolling flowers in my life! Thank goodness I bought a quilling tool a while back because it really helped make it go faster.
The rolled flowers on this set were a big pain in the backside! Because I cut them so small, this one kept tearing on me. I like the way they look, though!
And, last but not least, the men's sets! There are only 3 male teachers and I really struggled with what kind of clip they could use. I honestly figure they'll never use these, but I didn't want to do pencils or crayons since they're on the other boxes I made. I really like how bright and fun they. I may need to make some for me...
I put each set of clips on a card I designed on my Gypsy using George and Basic Shapes, then put them in the clear bags and taped them shut on the back.
That's all, folks! I hope you're having a fabulous weekend.
Hugs,
Cheryl
Thursday, March 8, 2012
My first video!!!! (3D Oval Flowers)
I'm so very excited to post my first video. As I was typing the title, all I could think of was the great 80's song "Video Killed the Radio Star". Anyone else jam out to that song? I thought so.
I certainly learned a few things making this video. I wasn't a bit nervous...until the camera turned on. Then I couldn't keep my thoughts straight because I was trying so hard to keep my thoughts straight. Does that make sense? I definitely am not thrilled with my maiden voyage into video land, but I decided to go ahead and post because I promised. =) I learned that I keep rolling my eyes and looking off into space and having "crazy eyes". I would say I'm not that crazy in real life, but I can't see my own eyes, so I have no idea...ha ha.
I could go on and on about all the things I'm not in love with on the video, but I will not bore you with that. I hope this helps explain how I made the 3D flowers. And if it doesn't, please send me any questions you might have.
I am ready to try more videos and would love your feedback. Is there anything you'd like to see me make or any techniques I can show you? Please let me know!
Blessings,
Cheryl
Friday, March 2, 2012
More Flower Cards!
Hi Everyone! I have a couple of cards to share with you today. I am SUPER DUPER excited that I filmed my first video for you guys this week. I did a tutorial on how to make the cards shown below and in this post. I am working on editing the video and oh boy - this is all new to me! I enjoyed filming and can't wait to do more. I hope to have the video up in the next day or so, but until then, here are a few cards to look at!
Saturday, February 18, 2012
Flowers...again
Do you ever get sick of seeing my cards with flowers on them? I. Can't. Help. Myself. (If you love "You've Got Mail" like I do, you'll recognize that line...punctuation included) Anyway, I have yet another card to share with a flower on it. I love those flowers, I tell ya.
Wednesday, February 15, 2012
Back to Normal...
Happy Wednesday! I feel like it's been forever since I've been around here. What a busy, busy past few days! As I mentioned in my previous post, we had been preparing for a big dinner at church on Monday night. We worked all day Saturday decorating, then worked all day Monday cooking. I thought it turned out to be a fabulous evening and the dinner got great reviews! I also have to mention that I have the best pals in the world at church - everyone pitched in and worked until exhaustion to make sure things were just right. I took Tuesday off to recuperate and now I'm back to normal life, I think. =)
I have a bunch of cards to share with you so let's get to the first one...
Wednesday, February 8, 2012
Busy, Busy, Busy!
For the last few weeks, we’ve been working on planning a big
dinner that’s held annually at our church.
My bestie (my hubby told me that’s what I should call her after he heard
it on The Big Bang Theory) and I plan the dinner and décor and oversee the
preparations. I really enjoy it, but it’s
super time consuming and certainly makes us work hard! We have fabulous volunteers that work very
hard to make it a success and it’s worth all the hard work. Since I’ve been working on that for a few
weeks, and the dinner is next Monday, I will not be spotlighting a cartridge of
the month for February. I have had no
time to craft…and I’m having withdrawals!
Thursday, January 19, 2012
Scalloped Thank You Card
Do you remember a few weeks ago when I admitted to all you that I was a paper hoarder? I am happy to say that I've been using up some of my stash. So, now I have another problem....
Thursday, November 17, 2011
Fun Acorn Card
Today I want to share a fun little card I made. This will probably be my last Thanksgiving card because it's time to get ready for Christmas. I realize alot of folks have been sharing Christmas projects for weeks now, but I think we rush into Christmas way too fast, so I decided to enjoy the Thanksgiving holiday before moving to the next holiday. OK...on to the important stuff.
Blessings,
Cheryl
The colors aren't great in the pic. As I mentioned in a previous post, since I killed one of my lights, I'm having difficulty getting good pictures. I am working on getting a new one (bought one and it's worthless so I have to try again).
For the card base, I used the rounded square from George and Basic Shapes and welded the acorn to it using my Gypsy. The acorn is from Doodlecharms.
I cut the acorn out in kraft cardstock and attached the card. I then cut it again in the darker brown and just used the top portion. I embossed it and attached it with foam dots.
The sentiment is a stamp from Walmart's dollar bin. I added some twine and bling and attached it with foam dots. I inked the edges of everything with Chestnut Colorbox ink.
Thanks for stopping by today. I so appreciate all of you taking time from your busy schedule to check out my crafty stuff. And I love sharing it with you!
Blessings,
Cheryl
Monday, November 14, 2011
Business Cards
Hola Amigos! I had a discussion with my friend a few weeks ago about business cards, so I wanted to share some examples with you that I made. I've only done a few craft shows over the last few years, but I've noticed there's always someone who wants a card with your email or # on it. I decided I didn't want plain printed business cards, so I embellished mine. I figure a paper crafter needs a crafty card, right? Here's what I did.
(Disclaimer on photos: I broke my light that came with my light box so I bought a replacement. I'm discovering it's not as good, so please bear with the poorly lit photos until I can get another light! On my little camera screen they looked ok, but on the computer you can really tell they need better light.)
I printed the business cards myself on cardstock. I added a striped mat to the back of the card and then punched some flowers and layered them in the corner. Here's my theory - If you give them a plain business card, they end up putting it in their pocket or purse and it falls to the bottom. If you give them one that's a fun shape or has something fancy on it, they're less likely to just toss it somewhere and forget you. I have no idea of my theory is correct...but it makes sense to me!
I also made a couple that would be great for a photography business.
On this first one, I was thinking it would be fun to make it look like film. I realize most cameras are digital now and don't use film, but who cares! It's still fun! I used George and Basic Shapes to make the rectangle, then added smaller rectangles along the edges (using my Gypsy) and cut it out. I just added the business card right in the middle.
For this one, I cut the camera from Create A Critter. I printed the business card, then used the circle cut out for the lens as a pattern to cut the "card" portion. You could also print several on a page and use the center point feature on your Cricut to cut around the wording. I then glued the "card" onto a black oval and adhered it to the camera cut.
As I was thinking along these lines, I had several ideas that would make fun business cards. I think it's really important to have your contact information available when you are out and about, so why not make it reflect your personality and style? Never be boring! =)
Have a blessed day!
Cheryl
Friday, November 11, 2011
Mojo Monday Card
I am on a roll with these challenges this week! I have had a blast creating things for the different challenges. I've never used a Mojo Monday Sketch before and I have to admit....I might be hooked! I have actually never used a card sketch before at all and it was a nice change to have the layout already done for me. Here's the sketch we were to use:
And here's my interpretation.
The paper is from DCWV All About Girls Stack. I used my Cricut.to cut all the shapes for the card. I used George and Basic for the circle and ribbon/pennant shape. For the pennant, I used a rectangle and added a triangle at the bottom on my Gypsy, so when it cut it made the correct shape.
The flower and leaves are from Plantin Schoolbook. I cut the flower in 3 sizes and cut 3 of each size. I layered them all and clipped together with a brad, then curled the edges just a bit. I did two layers of each leaf so they would stand up a bit.
And here's my interpretation.
The paper is from DCWV All About Girls Stack. I used my Cricut.to cut all the shapes for the card. I used George and Basic for the circle and ribbon/pennant shape. For the pennant, I used a rectangle and added a triangle at the bottom on my Gypsy, so when it cut it made the correct shape.
The flower and leaves are from Plantin Schoolbook. I cut the flower in 3 sizes and cut 3 of each size. I layered them all and clipped together with a brad, then curled the edges just a bit. I did two layers of each leaf so they would stand up a bit.
I inked the edges of everything using Brown Colorbox ink. For the sentiment, I cut a shape in two sizes from Elegant Edges and layered them. The stamp is by Verve Stamps. Can I just say how much I love Verve Stamps? They are Fab-u-lous! (No, they're not paying me to say this...but I wish they would!) You can check them out HERE.
It's hard to tell in some of the pictures (especially with a broken light and horrible pics!), but the paper has lots of glitter and sparkles on it. Love. It. I would like to encourage you to check out the Mojo Monday Sketches and maybe try your hand at it. I had a great time trying it out!
Blessings,
Cheryl
Thursday, November 10, 2011
My Craft Spot Challenge #32
I haven't participated in a challenge for a while, so I got busy this week. I made this card for the Monday challenge at My Craft Spot. The challenge is to create a project with a Thanksgiving theme.
The sentiment was printed from my computer and I hand cut the banner shape. (As you can tell if you look closely....the ends aren't even!). I think my printer is low on ink because the letters don't look too vibrant. Oh well! I added a button with some twine spiff up the sentiment. This was a fun card to make - I like that fancy turkey just sitting there waiting to be eaten! I'm not a big turkey eater, but it looks cute on a card!
I cut the oval from George and Basic Shapes to give the turkey a "mat". I added the turkey using foam dots for some dimension. I was determined to use this background paper and I still don't love it, honestly. I think it's good thanksgiving colors, but it was hard to work with.
I inked all the edges using Brown ink by Colorbox and voila!
That's it for today.
Blessings!
Cheryl
Products Used:
Thursday, August 4, 2011
Say Cheese!
My friend at church ordered some cards from me last week. He asked for 5 thank you cards, 3 masculine and 2 feminine. The 2 girlie ones - No prob Bob. Easy as pie! So, moving on to the masculine ones, I started hitting the wall, but made it through 2 of them. Then came the big challenge. You see, my friend Jimmy is a photographer. He just had a conference and wanted to send a thank you card to a fellow photographer, who happens to be male. He asked that his card have a photography theme. 4 attempts later and this is what I came up with.
Let me start out by saying I do realize this is not a Polaroid camera and yes those are supposed to look like Polaroid pictures. But oh well! I like em anyway! I made the white "frame" for the picture using a couple of squares from George and Basic Shapes. I cut the cityscape from Plantin Schoolbook.
The camera is from Create a Critter. I cut the gray parts from metallic paper (I know it's hard to see in the pic) and added glossy accents to the lens to make it shiny.
I also added some black cord to the camera for a strap and put it on with foam tape to make it stand out. I wrote thank you on the picture with a Sharpie. I was going for the look of someone documenting their pictures like they did back in the day. Remember when people took Polaroid pictures and wrote the names and dates on the bottom? I do. Vaguely. I never had a Polaroid camera, but I do remember going to school or church and them taking our picture for mother's day crafts using a Polaroid. How did we ever take pictures without a digital camera and photo editing software?????
I would never have known I'd have this much trouble with this simple card. When I know someone is paying me their hard earned cash for cards, I tend to OBSESS over them a bit too much. I want them to be happy with the finished product and feel they got their money's worth. I would hate for them to give someone a hideous card with my name on the back of it! Or....gasp! Pay me for a card they're too embarrassed to give away because they think it looks bad. I know I'm probably the only one who does this, but my type A personality can't help it.
One last thing, I promise! As I mentioned, my friend Jimmy is a photographer. He does a podcast each week with photo tips and ideas and offers instructional CD's and DVD's for sale. If you want to learn some tips or become better at photography, you should check him out at the Photo Tips site. I promise, he's not paying me to say this, it's my honest opinion!
Well, that's it for today. Have a blessed and happy Thursday!
Blessings,
Cheryl
Saturday, July 30, 2011
Flowery Thank You!
As some of you may remember, I mentioned a few weeks ago that several folks helped me out and spent a TON of time helping me with my booth at the conference earlier in the month. Now that I've given them their thank you cards, I can share them with you!
Lately, I've been totally enthralled with the work of Donna Mundinger over at Popsicle Toes. She's fabulous at making shaped cards with tons of layers. This card was inspired by her style. I am not nearly as talented as her when it comes to layering, but I'm certainly gonna practice!
Here's a front view of the card. I used Gypsy Wanderings, Serenade and George and Basic Shapes for the card.
From the front, it's hard to tell how it's put together. As you can see, the front of the card is shaped and the back is plain. For the base, I used brown Kraft paper. The patterned paper is from a stack by Recollections from Michael's.
This is an inside view. I welded the shadow of the flowers and the phrase to the shape to form the card. I cut a liner from patterned paper to cover the inside.
For each flower, I cut a few shadows and a few layers of each shape. I added pearls to the center for accent on each flower.
I put some pearls on the letters because they looked sorta plain to me. I've never been a big fan of pearls, normally I prefer something more "bling-y", but I am starting to love them after using them on this card!
On several of the blogs I follow, I've read about alot of folks using colored foam and making their own dimensionals, so I tried that with this card. I bought a big pack of colored fun foam that's sticky on one side. I've heard about people running it through their Xyron machine to make a sticker, but I just ran a line of adhesive from my ATG gun on it and stuck it on. If you look closely, you can see a tiny bit of the foam, but since it's color matched to the flowers, it's actually quite camouflaged. I never thought it would be that much cheaper, but now I'm a believer!
Here's one last look at the front of the card. There's just one problem - I didn't leave much room to write without my words showing! Yikes! It's for my mom and I know she understands beauty over function, so it's all good! Things have to look good and then we worry about them being functional!!
Thanks for stopping by today! I hope you all have a wonderful, blessed day!
Blessings,
Cheryl
Lately, I've been totally enthralled with the work of Donna Mundinger over at Popsicle Toes. She's fabulous at making shaped cards with tons of layers. This card was inspired by her style. I am not nearly as talented as her when it comes to layering, but I'm certainly gonna practice!
Here's a front view of the card. I used Gypsy Wanderings, Serenade and George and Basic Shapes for the card.
From the front, it's hard to tell how it's put together. As you can see, the front of the card is shaped and the back is plain. For the base, I used brown Kraft paper. The patterned paper is from a stack by Recollections from Michael's.
This is an inside view. I welded the shadow of the flowers and the phrase to the shape to form the card. I cut a liner from patterned paper to cover the inside.
For each flower, I cut a few shadows and a few layers of each shape. I added pearls to the center for accent on each flower.
On several of the blogs I follow, I've read about alot of folks using colored foam and making their own dimensionals, so I tried that with this card. I bought a big pack of colored fun foam that's sticky on one side. I've heard about people running it through their Xyron machine to make a sticker, but I just ran a line of adhesive from my ATG gun on it and stuck it on. If you look closely, you can see a tiny bit of the foam, but since it's color matched to the flowers, it's actually quite camouflaged. I never thought it would be that much cheaper, but now I'm a believer!
Here's one last look at the front of the card. There's just one problem - I didn't leave much room to write without my words showing! Yikes! It's for my mom and I know she understands beauty over function, so it's all good! Things have to look good and then we worry about them being functional!!
Thanks for stopping by today! I hope you all have a wonderful, blessed day!
Blessings,
Cheryl
Subscribe to:
Posts (Atom)