Showing posts with label Elegant Edges. Show all posts

Monday, June 10, 2013

Long time, No blogging...

Hi strangers!  I wanted to pop in and say hello to all of you.  As I mentioned in my previous posts, we've been dealing with crazy weather and it's aftermath for a while in my little town of Moore, Oklahoma.

After the May 20 tornado hit our town, we had another round of storms come through Oklahoma on May 31.  Our town was hit again, this time with extreme winds and flooding.  Our yard, which had just been cleaned, is now covered with junk again, that was blown from the piles of debris around town.  We had a few tree limbs down, but fared pretty well during the second storm.  During this time, I've been dealing with an ongoing ear-sinus-throat issue that is taking forever to go away.  I went to the doc for the second time on Thursday and now we're trying another medication.  I feel much better and for the first time in weeks, I feel like I'm getting back to normal.

I have a busy few weeks ahead with storm clean up and our annual ladies retreat at church (I am teaching 2 classes) and then hopefully things will slow down and be back to normal.

Before all this mess, I had made several cards and taken photos, so I wanted to share one with you today...


This is a pretty simple card using My Mind's Eye paper.


The only cricut cuts on the card are the brown scalloped circle and the cream colored piece with the sentiment.  They are both from Elegant Edges.


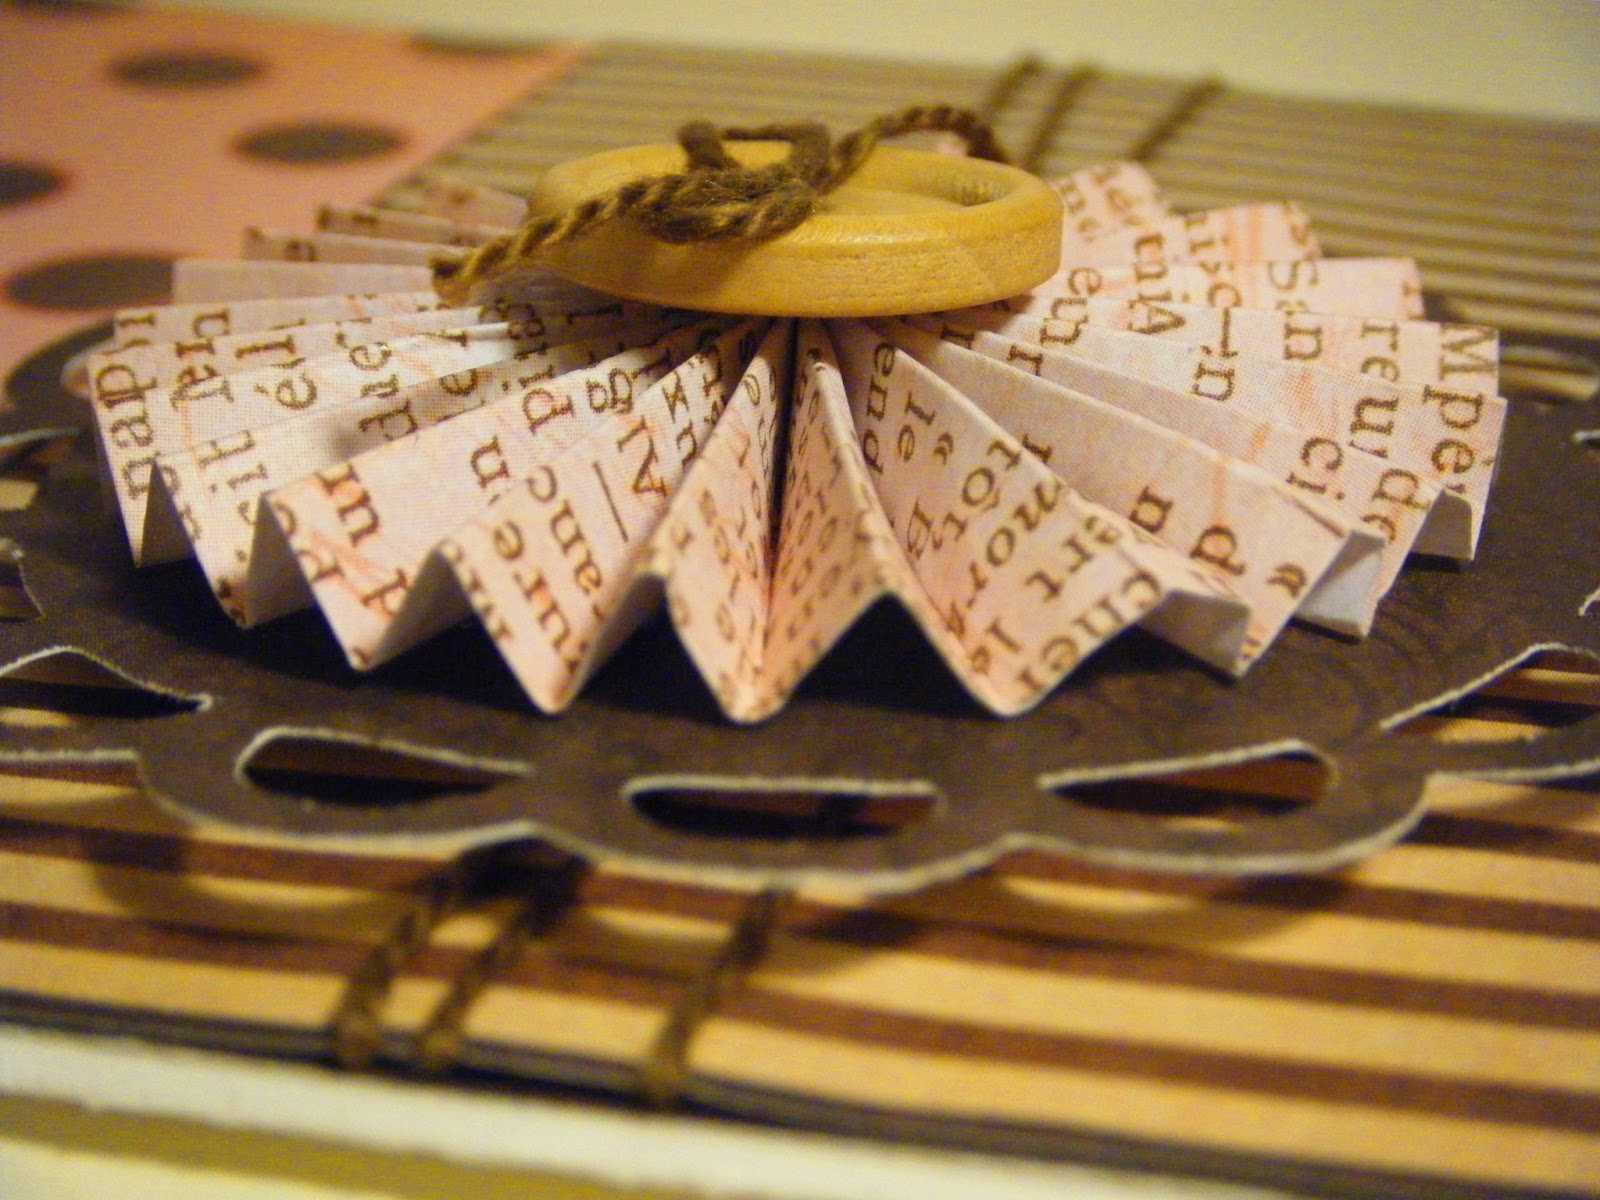
I made the rosette with a 12" x 1.5" strip of paper, scored every .25".


I totally snagged this layout from a sketch I found on Pinterest.

That's all I have for today.  I haven't been at my craft desk in several weeks due to all the junk going on.  I miss that baby!!!  I hope to have some time this week to make some thank you cards.  Crossing my fingers...

Blessings,
Cheryl


Sunday, April 14, 2013

Smile Card

I've always wanted to own Echo Park paper.  Isn't that crazy?  I don't buy a lot of paper online because I'm too cheap to pay shipping, and my local stores didn't carry it.  Finally, Hobby Lobby, our local craft store, started carrying a few of the 6x6 pads.  So I bought all of them!  I really like Echo Park's style and the color schemes of their paper.

So, here's my first card using my new paper....


This card is really simple, but I was in a hurry and had to try out the new paper.  Aren't the colors fab?


Sadly, I cannot find where I wrote down the sizes of the cuts, so I can't share that with you.  I do know the base is from Elegant Edges and the star is from Plantin Schoolbook.  I hand cut the banner that contains the sentiment.

That's all I have for today.  Have a fabulous afternoon!

Cheryl


Friday, April 12, 2013

Sunny Yellow Card!

Happy Friday everyone!  I hope your week has gone well.  I spent a few hours this week editing the gazillion  pictures of cards on my camera and I'm finally ready to share some with you.  I had totally forgotten about this card, so finding the picture was a nice surprise!


For the base of this card, I used a cut from Elegant Edges.  It's the "book" cut from page 48, sized at 5.25'.  I welded two of them together to make the card, which fits in an A2 sized envelope.  


The paper is My Minds Eye - Lost and Found.  I inked all the edges with black ink, then added the sentiment, which is by Stampendous.


The flower and leaves are from Flower Shoppe.  The flower was cut at 1.00", 1.25" and 1.75".  I apparently didn't write down the size I cut the leaves, but I would guess around 1.75"  I punched two holes in the middle of the flower and tied some twine through.


I used my scraps for the inside of the card, just to jazz it up a little.  This card was quick and simple to make.  I think this would be a great design to mass produce using scraps.  I just might do that...

Check in later today for Font Friday!

Blessings,
Cheryl


Saturday, March 16, 2013

I {heart} pink!

As I've said before, I LOVE pink.  I mean love it with all my heart.  One of my ultimate goals is to own a pink car.  I always tell my husband that I will never understand people who settle for being boring.  I think a pink car is anything but boring!  I could totally go for this...


I had a Barbie corvette like this when I was a kid. (Yes, I loooooove Barbie!!)  I would so own this car if I could.  And I would proudly drive it all over!  

So, I was going to share a pink card, then got sidetracked by the beauty of all things pink.  Let's get back on track here...


As I said in the last post, my lights are broken, so please bear with my poorly lit photos.  I've been so busy and scattered lately, I keep forgetting to buy new lights!  All the paper for this card is from the Lost & Found Two stack by My Mind's Eye.  You can get it on Amazon here:


Here's a side view of the card...


And one more close up of the front...


Here's the recipe for the card:

All papers - My Mind's Eye Lost & Found Two stack
Leaves - Flower Shoppe, cut at 1.25" & 1.5"
Flowers - Flower Shoppe, cut at 1.75", 1.25" &.75"
Base - Elegant Edges, welded and cut at 5"

I hope you've enjoyed all the pink-licious-ness!

Blessings,
Cheryl


Friday, January 25, 2013

Simple Card

Howdy friends!  I have a super quick and easy card to share with you today.  I had mentioned previously that I was going to start using the same sketch to make multiple cards using different papers, stamps, etc.  This is one of those cards.


The base is from Elegant Edges.  I welded two shapes together to form the card.  I really like the simplicity of this card, and I think the shaped edge adds a little something.  


I cut the leaves and flowers in varying sizes, then layered them with foam dots.  I inked the edges of everything with brown ink, then added a tranluscent jewel-ish thing to the center of the flower. (I have no idea where it came from or what it's officially called??)


I didn't add a sentiment to the front of the card because I'm not sure what I'll use it for yet.  I also don't have any measurements to share with you because I apparently lost the paper where I wrote them down. Oops!!

I have made several more cards using this same basic layout and I'll be sharing those in the next few weeks. Have a great Friday!

Blessings,
Cheryl  


Saturday, January 5, 2013

Fun Flower Card


Hello all my wonderful friends!  I hope the new year is treating you well.  Mine has been more eventful than I'd hoped, consisting of car trouble and work drama, but it's still been good and I'm happy and blessed!

I finally have a card to share with you.  Can you believe it?


I used a shape from Elegant Edges for the base of the card.  I welded the shadows together using my Gypsy, then cut the next layer in black.  I then cut the floral layer using the same shape, but one size down.  The ovals are from Plantin Schoolbook.  The stamp I used is from Verve.  All cut sizes are listed at the end of the post.


The flowers are from Flower Shoppe and cut at 3 different sizes.  I put a brad in the center of each, then layered them and attached using foam dots.  

This card was really simple to make, but I like how it turned out.  Since I tend to give away and sell several cards per month, I often get creative block or run out of ideas.  I have decided to start trying to make several cards using the same design/sketch, so I'm working on a few more using this layout.  When you create, do you make every card different?  Or do you use the same layout/sketch with different papers? I used to try to make every single card different, but as I've needed more cards, this has become more stressful.  So, I figure when I find a layout I really like, why not use it more than once with different papers?  I'd love to hear your thoughts and ideas on this.

Card Recipe:
Patterned Paper: It's the Little Things by Fancy Pants
Solid: Recollections cardstock
Card Base: 5.5" from Elegant Edges
Black Layer: 5.5" from Elegant Edges
Floral Layer: 4.75" from Elegant Edges
Black Oval: 3.75" from Plantin Schoolbook
Striped Oval: 3.5" from Plantin Schoolbook
Cream Oval: 3.25" from Plantin Schoolbook
Flowers: 1.5", 1.75", 2" from Flower Shoppe
Brads: Oriental Trading
Stamp: Verve
Ink: Stampendous

It's so nice to be back sharing projects with all of you.  Have a fabulous weekend!

Blessings,
Cheryl

Monday, October 22, 2012

Happy Card!


I am really excited about the card I'm sharing with you today.  It's so bright and cheery and happy!


I've seen many flowers made using circle punches, so I thought I'd try my hand at it.  Of course, I used my Cricut and not punches, but it works!  I have had one sheet of this striped paper forever and finally decided to use it.  It was hard to cut into it because I like it so much (and want to hoard it), but I managed to pull out that trimmer start cutting.


I layered 3 circles on top of each other with foam dots in between, so they really stood out.  I also put the leaves on using foam dots.  The sentiment is a stamp by Stampendous and the blue border came from Elegant Edges.


I can't wait to make more of these flowers!  I really had fun with them and I think they could be great if I tried mixing patterns and colors on each flower.

Card Recipe:
Base - Recollections Cardstock, cut at 9.25" x 4.75"
Striped Paper - Colorbok, cut at 9.25" x 3"
Blue Paper - Colorbok, cut 2 using Elegant Edges @ 1.47", Border <shift> on pg 55
Yellow Paper - Colorbok, cut at 9.25" x 4
Flowers - The Paper Studio, cut using Plantin Schoolbook @ 1.5", 1.25", 1", Circle on pg 72
Leaves - Recollections, cut using Straight From The Nest @ 4", Branch-1 <shift> on pg 42

Have a fabulous day!

Adios,
Cheryl


Wednesday, October 3, 2012

Simple Pink Card

 I made this card several weeks ago and then never mailed it.  Pathetic, I know.  I had every intention of doing it, then lost track of time and just didn't.  Thankfully, the person I was going to send it to is well now!  I thought I'd go ahead and post it anyway and save it for when I need a Get Well card.


Surprise!  Its has a flower on it!  I just can't help myself.  I will say, though, this was made before I went on my strike from making cards with flowers (just to see if I could).  And I have been successful so far, but I tell ya, I miss em!  And I'll be making more very soon!  I used my Gypsy and welded together the shadows of this shape to make the card base.  


I cut the flower and leaves from Flower Shoppe and hand cut the banner for the sentiment.  I inked all the edges using Martha Stewart ink.


Here's a pic of the inside.  I added some extra flowers just because.

Card Recipe:
Base - Recollections Card Stock, from Elegant Edges cut at 4.5"
Front layers - DCVW Floral Stack, from Elegant Edges cut at 4.5" & 4.25"
Flowers - Martha Stewart Card Stock, from Flower Shoppe cut at 1.5", 1.25", 1"
Leaves - The Paper Studio Card Stock, from Flower Shoppe cut at 1.5"
Ink - Martha Stewart
Stamp - Stampendous
Pearl - Recollections

I hope you enjoyed this simple card.  Of course, I love it because there's so much pink!

Blessings,
Cheryl


Wednesday, September 26, 2012

Top 5 Cartridges

As I've mentioned many times, I am not a fan of bugs.  A few weeks ago, on a Saturday morning, my hubby and I sat down on the couch to eat our oatmeal before he went to bed (he works nights).  My desk is in my living room and I have this rolling cart beside it that has a bunch of drawers with stainless steel accents.  I looked across the room and saw this hanging under the bar on top of the cart.


Ewwwwwwwwwwwwwww!

A praying mantis was perched upside down on the rails.  I start shrieking, like any normal, bug-fearing woman would do.  My husband is like "Zip it and get the camera!".  He thought it was super cool, so he took a ton of pictures before putting him in a cup and letting him go.  Of course, then I got a lesson on how important they are because they eat other bugs and are "so neat and cool".  I still don't like them and their creepy antennae, long legs and beady eyes!  His lesson did not change my mind.  I am still an irrational, bug-fearing gal.

On to more pleasant topics....

Today, I wanted to talk about cartridges.  For a while there, I was buying a new cartridge every month.  I would wait impatiently for Hello Thursday and make my list of what I wanted.  I must admit, I don't feel that way much anymore.  A lot of the new cartridges have been digital or lite and not really things I would use frequently.  I have several older carts that I seem to use on almost every card.  I thought I'd share my favorites with all of you, in case you're in the market for some new carts!  Here goes...


Elegant Edges - Thanks to you all, I bought this cartridge.  I put it off for a long time because I was being cheap, but after all the comments telling me it was good, I went for it.  And I can say, it's probably my favorite cartridge.  If you don't own this one, I would highly recommend it.


Birthday Bash - When I bought this cartridge, I was on the Flaunt it Fridays design team and I needed it for some projects.  I wasn't sure I even wanted it before then, but I figured I could use it eventually.  It's great!  Besides the great cuts for kid's cards, it has good shaped cards and I love the Ice Cream Sundae cut on it!  The font is really nice as well.  It's very versatile and has much more than you'd think at first glance.


Flower Shoppe - Do I even have to explain this one?  My love for flowers is quite obvious if you've been to my blog at all!  I love, love, love the 3D flowers on this cartridge.  This one is tied with Elegant Edges for my most used cart.  Buy it today!!!  You can get a really good deal on it right now at Amazon.  Go HERE to check it out.


Tags, Bags, Boxes and More 2 - I {heart} boxes and bags!  The original TBBM was a good cartridge and I used it like crazy.  This one is much more versatile and has some very creative cuts.  I really like the cards and envelopes...although I haven't figured them all out yet!  The scoring blade option is awesome as well, especially when you have to cut 25 bags at a time.


Forever Young - This is just a fun cartridge!  It's girlie, flirty and super cute. The silhouettes  are really nice, but my favorite cuts are the flowers.  They have lots of layers which gives you a great amount of versatility in using them.


These are some of my favorites.  What are yours?  I have a few new ones I want to buy, and Wild Card 2 is on the top of that list.  Have any of you bought/tried that cart?  I'd love to know your feedback.

Have a blessed day!
Cheryl

Monday, September 24, 2012

Trees!

Last week, I posted a pocket card based on a sketch I found.  I made two that day, so I thought I'd share the second one with you now. 

A long time ago, I kept eyeballing the DCWV Green stack at Hobby Lobby.  Every time I'd look at it, I would fall in love with this cute little beaver and skunk paper in the stack.  So, eventually, I broke down and bought it.  Once I got it home, I tried to use it several times on several projects.  I have come to the conclusion that I don't have much need for beavers or skunks on most of my cards, no matter how cute they are.

When I started working on this card and was looking through my paper, I thought "Why not use the trees?". I may as well get some use out of that paper I just had to have.  I am actually quite happy with how it turned out.  I love the colors of the trees.

The woodgrain paper is also from the same stack.  I think it looks great with the trees.  Very nature-ish, right?

I wasn't sure what I'd use this tree card for, so I went with a simple, generic sentiment.

Just like the previous card, I added a ribbon at the top as a tab to pull the card out of the pocket.

Card Recipe:
Base - Recollections cardstock, cut at 5.25" from Elegant Edges
Brown mat - DCWV Green stack, cut at 4.5" x  4.5"
Woodgrain mat -  DCWV Green stack , cut at 4.25" x 4.25"
Tree mat - DCWV Green stack, cut at 4" x 4"
Cream card (inside) - Recollections cardstock, cut at 3" x 3.25"
Woodgrain mat (inside) - DCWV Green stack, cut at 3.25" x 3.5"
Stamp - Studio G
Ink - Versamark

These pocket cards make me smile.  They were really fast to make, yet they don't look too simple.  You should try one!

Blessings,
Cheryl


Monday, September 17, 2012

Pocket Card

I follow a ton of paper crafting blogs. A TON.  Alot of times, I'll look at them at work on my break.  When I find something really inspiring, I'll either email it to myself or jot down the sketch on a piece of paper.  A few days ago, I was cleaning in my spare bedroom (a.k.a. Disaster Area) and I saw this little post-it note stuck to the side of a Rubbermaid container and on it was the sketch for this card.  I have no idea where I saw the original card or sketch, but I thought I should try it.  So I did.  Twice.  Here's the first card I made based on that sketch.

The base of the card is from Elegant Edges.  I cut it from cream cardstock, then inked the edges.  The rest of the layers were cut using my trimmer.

The sentiment is from a stamp by Studio G.  I love the old fashioned, typewriter-ish look of the font.  I added the sentiment using foam dots to make it stand out a bit more.

I made a smaller card to go inside the pocket, then punched a small hole at the top for the ribbon.

I then threaded the ribbon through the top to make a pull tab.  I used my 1.25" punch to cut the notch in the striped paper.  I have to tell ya... That piece of cardstock is in that pocket sideways and it's wreaking havoc with my OCD.  I wish I'd caught it when I took the picture, but I didn't.

Card Recipe:
Base - Recollections cardstock, cut at 5.25" from Elegant Edges
Brown mat - Recollections Mosaic stack, cut at 4.5" x  4.5"
Pink polka dot mat - Recollections Mosaic stack, cut at 4.25" x 4.25"
Striped mat - Recollections Mosaic stack, cut at 4" x 4"
Cream card (inside) - Recollections cardstock, cut at 3.5" x 3.25"
Stamp - Studio G
Ink - Versamark

I am so happy I found that little paper with this sketch on it.  I am definitely going to use this layout again.  I made this card super simple, but I think it would be pretty to decorate the outside of the pocket with flowers or butterflies and fancies!  

Have a blessed day!
Cheryl


Monday, August 13, 2012

Butterflies!


I hate bugs.  I mean I hate them with all that is within me.  My husband frequently tells me that he will never slay any dragons, but his job as my knight in shining armor is to slay crickets (the worst!!!), grasshoppers, spiders and all manner of flying things.  

On Saturday night, we were running some errands and stopped at a shopping center.  I ran in Michael's to grab some paper and was going to meet my husband at Barnes & Noble bookstore a few doors down when I was done.  While shopping, I got a text that read "Honey, beware, there are literally hundreds of crickets around the entrance to the bookstore".  Now, I am not sure if it would have been better for him to warn me or just not tell me, but of course, panic set in...

Tuesday, July 31, 2012

You are Fabulous!


It's been so long since I just sat down and crafted just for fun....and I love it!  I don't know about you, but I feel like I'm the most creative when I'm not on a deadline or have to make something specific.  I sat down at my desk over the weekend and just decided to make a card.  Here's what I came up with...


Monday, April 16, 2012